I’m not sure how this blueprint item can translate into a lab task, but I’m going to use it to do a brief SD-WAN overview, which may help with any troubleshooting of later “deployment” tasks. I won’t be going into the history of SD-WAN or all of the benefits. For that you can read chapter 1 of the book listed below.
For everything SD-WAN, I’m using this book:
Cisco Software-Defined Wide Area Networks: Designing, Deploying and Securing Your Next Generation WAN with Cisco SD-WAN
SD-WAN Terminology
We have a couple different pieces that make up this SD-WAN puzzle.
vManage: The box we’ll be using to manage everything, including onboarding, provisioning, monitoring, and troubleshooting
vSmart: Think of this as the control plane. vSmart communicates with the WAN edge routers using OMP. The three routing updates from vSmart to WAN Edge routers are TLOC, OMP, and Service. These updates are then used by the WAN Edges to build the data plane.
vBond: This box tells the routers how to find the vSmart and vManage boxes. vBond also authenticates and authorizes the other components.
System IP: Unique router identifier.
Site ID: Like a BGP AS number. See OMP Routes for where this comes into play.
Organization: Devices must be in the same organization to communicate with each other.
Color: Basically just means “Transport Protocol,” such as MPLS. This is important for the TLOC. (Totally misleading name, since the value isn’t usually a real color, it’s something like, “Metro-Ethernet”.)
TLOC: Transport Location. What is that supposed to mean? This one is pretty important.
- The TLOC is made up of the System IP + Color + Encapsulation (IPSec or GRE).
- Those three ingredients make a unique identifier.
- It’s important because it acts almost like a “Next Hop Router” in the OMP Routes.
- This is super important, see the OMP section below.
DTLS Insanity
I figured this was wonky enough that it was worth mentioning. DTLS ports are used for all nodes in an SD-WAN deployment to talk to each other (e.g. vManage to vSmart, or WAN Edge to vSmart, or vBond to vManage, etc). So we need to make sure UDP port 12346 is open between everyone…. that is, if they’re talking on Core 0 of the CPU.
These boxes are all VMs, each with up to 8 cores. So they map cores to DTLS ports to load balance communications and processing. They map as follows, incrementing the middle digit:
- Core 0 – 12346
- Core 1 – 12446
- Core 2 – 12546
- (so on….)
- Core 6 – 12946
- Core 7 – 13046
Setting Up Your Lab
Unlike DNAC, you can virtualize your SD-WAN lab pretty easily. The install guide is here. Download the components from software.cisco.com.
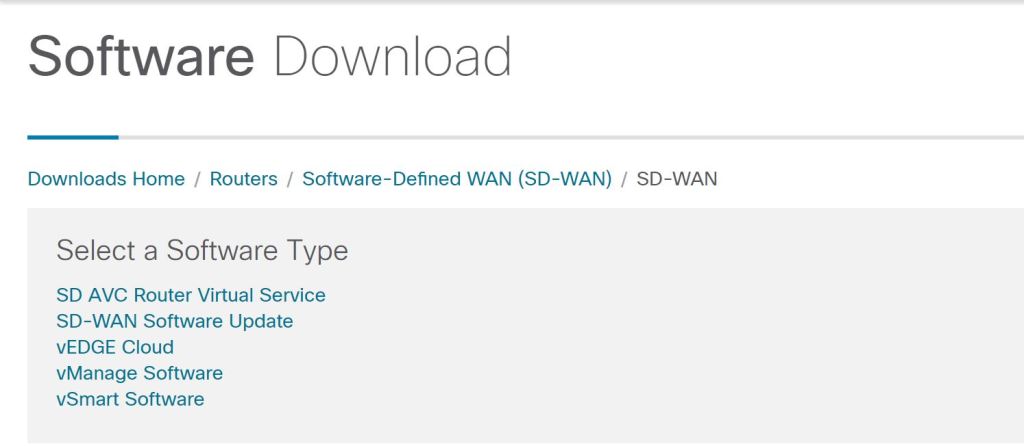
Initial install is pretty painless. In ESXi, just Create/Register VM and browse to the downloaded OVA. A couple things to point out:
- The vBond download is listed as vEdge Cloud. This is because a vBond is just a vEdge router that’s running only the vBond services. It can not also act as a router.
- The default username and password is admin/admin.
- When you start up vManage, it’ll complain that there’s no HDD and shut down. You need to manually add a second drive of at least 100GB for the vManage database.
- Kind of like ISE, there are some IOS-style commands you can run, such as show run.
vManage Initial Config
After logging in with admin/admin, you’ll be prompted to change the password. You then need to select the HDD you want to use for the vManage database.

Afterwards, you’re prompted for a username and password. I first tried my new vManage password, which didn’t work. So then I tried admin/admin and that did work. It turns out, this is a separate database username and password. We should update this one, too, to keep things secure. You have to stop the application-server, change the password, then start it again.
request nms application-server stop
request nms configuration-db update-admin-user
Enter current user name: admin
Enter current user password: admin
Enter new user name: admin
Enter new user password: C!sco123
request nms application-server start
Let’s configure VPN0, which is our Underlay VPN. I’m going to try to avoid overcomplicating this and not use the management VPN, VPN512, unless I have to.
config t
vpn 0
interface eth0
ip address 192.168.150.171/24
ip route 0.0.0.0/0 192.168.150.1 1
commit
(Don’t forget to commit your changes.)
Something interesting to note, you can type everything after config t all in one line, like this:
conf t
vpn 0 interface eth0 ip address 192.168.150.171/24
commit
I left the following commands off and vBond wouldn’t sync. It allowed me to add it to vManage and install certs, but just wouldn’t sync (no host-name showing, and no system-ip, etc). After adding these, it came right up.
config t
vpn 0
interface eth0
tunnel-interface
allow-service all
exit
no shutdown
Let’s also set up some base system config:
config t
system
site-id 100
system-ip 192.168.250.171
Now we can jump into the GUI and set things up. Let’s go straight to Administion > Settings. Before we can do anything with certificates, we have to set the Organization Name.
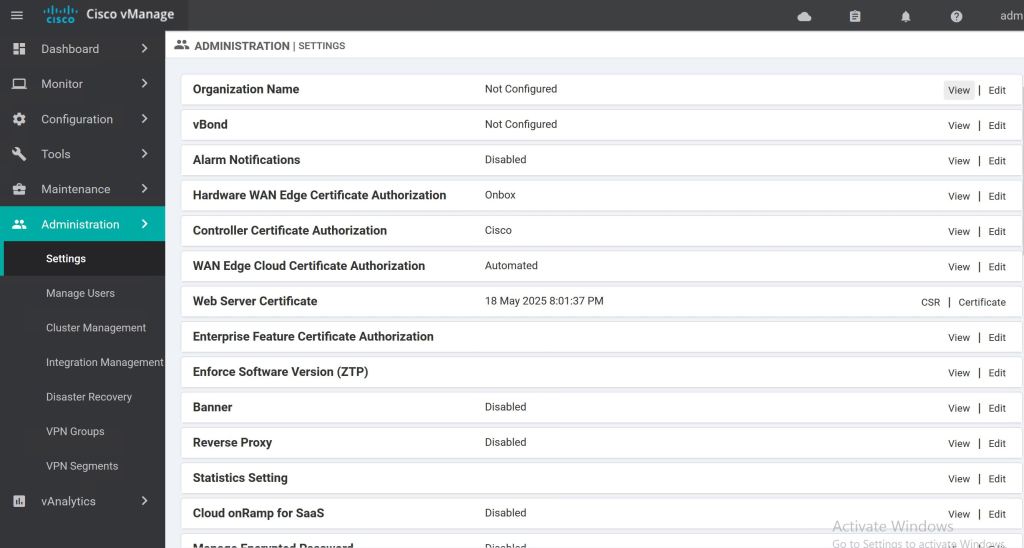
Then we should get our certs taken care of. The CA Root Cert is uploaded in the Controller Certificate Authorization section. When filling out the CSR fields, the Organization should be vIPtella Inc (no period after Inc., and the I and P are capitals). The OU field should match what you’re setting as your organization-name on each device.
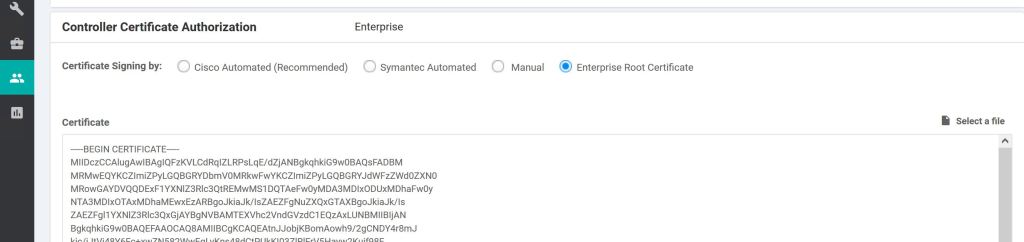
Select the Enterprise Root Certificate radio button and paste in your CA root cert, or click Select a file and upload it. Supposedly this root is supposed to be synced up to the other vNodes automatically, but I can’t find good documentation on that.
There’s also a Root-Cert-Sync URL:
https://{vmanage-ip}/dataservice/system/device/sync/rootcertchain
Check it from the CLI:
show certificate root-ca-cert
Once that is done, we want to take care of the system cert that’ll be used for authenticating our vManage to the other SD-WAN nodes. We go to Configuration > Certificates > Controllers and click the three little dots.
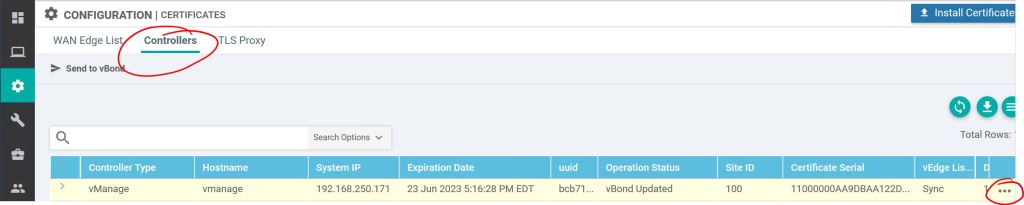
Click Generate CSR. Interestingly, you don’t get prompted to fill in any fields, the CSR fields are populated automatically by vManage. So we just need to jump over to our Windows CA, get it signed (I used a server auth & client auth template, the same one I use for pxGrid), and then come back and hit Install Certificate to upload the signed one.

A couple useful show commands on the vManage to check the status of the peer nodes:
show control ? (They’re all pretty useful, but these three are particularly good.)
show control summary
show control local-properties
show control connections
So let’s jump over to our vBond server and get it set up…
vBond
The vBond config is a bit different than the vManage config. One difference is the vBond defaults to four interfaces when you install the OVA, so you have to make sure you get your VM interface settings correct, and also configure the correct VPNs on vBond. The second thing, which is really big, is the vBond is really just an vEdge router. So we need to tell it to only be a vBond. That’s done with the vbond … local command. Also, you have to disable the VPN 0 tunnel-interface.
conf t
system
site-id 100
system-ip 192.168.250.171
vbond 192.168.150.173 local
organization-name MyOrg
vpn 0
interface ge0/0
no tunnel-interface
ip address 192.168.150.173/24
exit
ip route 0.0.0.0/0 192.168.150.1 1
commit
Installing the CA Root Cert is pretty painful. It’s supposed to be automatic with newer releases, but either I did something wrong, or it just wasn’t working (Looking back, I think it was because I hadn’t yet disabled the tunnel-interface setting on the vBond). I did find a really good how-to on manually copying it at nwktimes.blogspot.com
The way they suggested it, which worked great, was by using WINSCP to copy the root over to the /home/admin folder. Then run the following command from the CLI:
request root-cert-chain install /home/admin/my-ca-root.pem
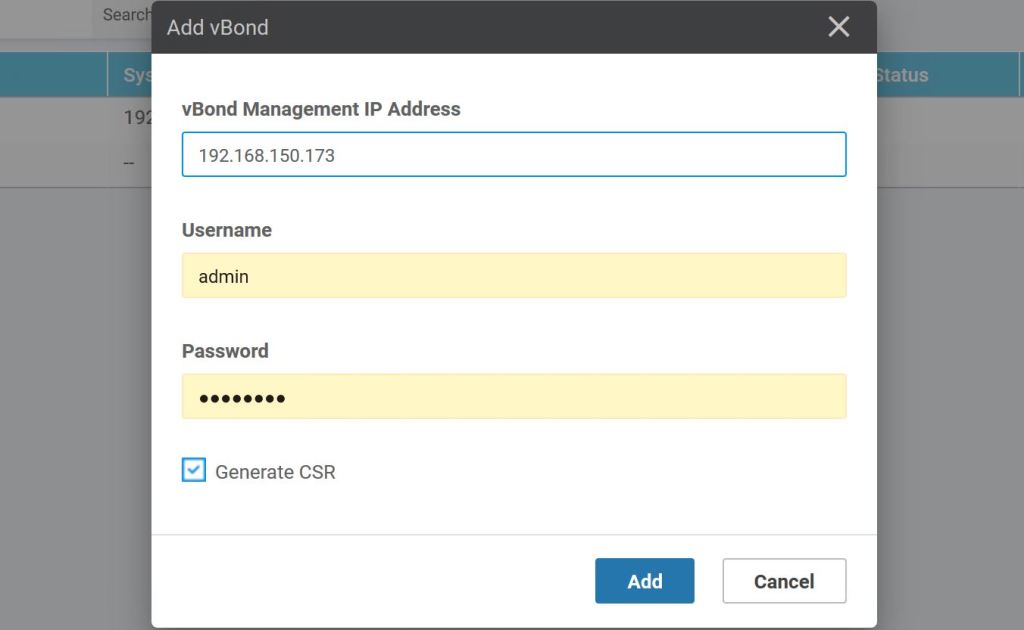
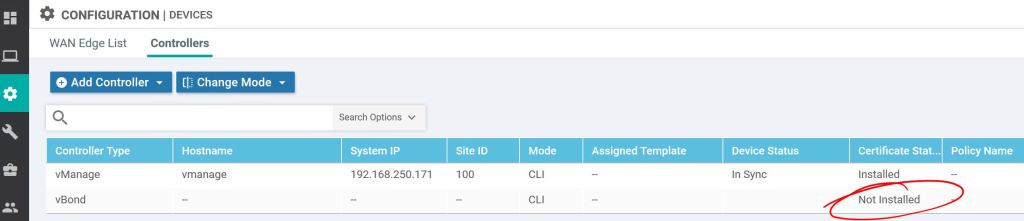
After the CA Root cert is installed, we should now be good to add the vBond into vManage under Configuration > Devices > Controllers, click Add Controller > vBond.

Enter the IP of the vBond, along with the username and password. Also, check the box to Generate a CSR, it’ll save a step later.
If you didn’t check the generate CSR box earlier, you can do it under Configuration > Certificates > Controllers. We don’t need to because we had checked the box when we were adding the vBond earlier.

After getting it signed by our very own Windows Server CA, we just have to import it, same as with the vManage.
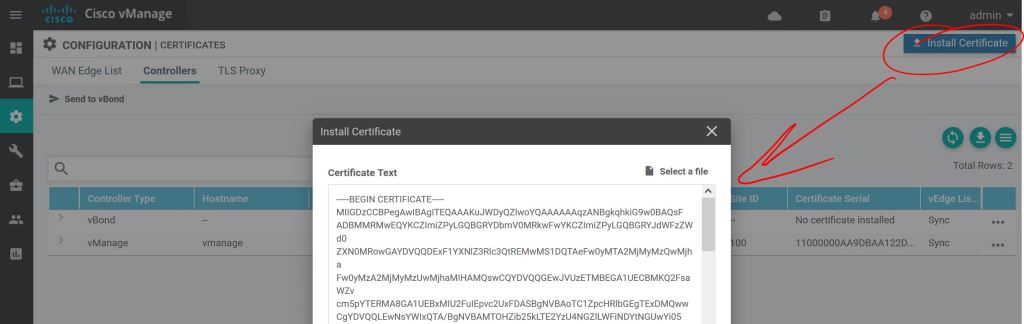
Click the little arrow to the left to see the details.

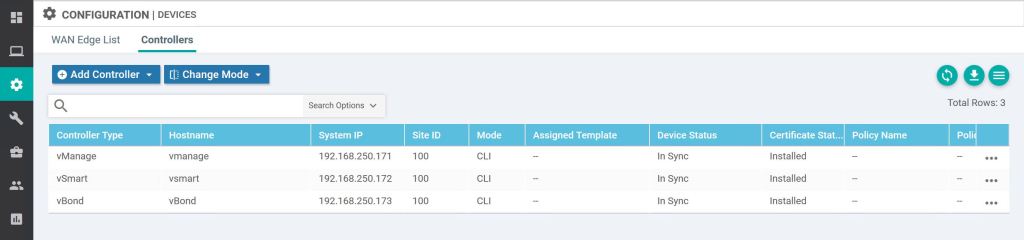
Then just rinse and repeat for vSmart. Just configure the system settings and the IP, add the root cert, join it to vManage from the Device menu, then do the system cert steps. Easy…
What about PNP and ZTP?
If you want a dedicated PNP/ZTP server, you use the same OVA as vEdge/vBond.
